Your assets in the Unity Package manager from a GiT subfolder
Since I shut down my video games studio, I managed to rebuild an upgraded version of assets we designed during that time. For my own…
Since I shut down my video games studio, I managed to rebuild an upgraded version of assets we designed during that time. For my own projects and for others, it’s an easy way to improve games projects quickly, so I started to share them on github.com/FredericRP and even from the asset store itself, for free.
With the package manager that is now used for both unity packages and asset store publishers packages, and more and more assets to publish, one question came over and over: how do I make it easy to import only the assets I want, and still manage a simple version control to share to everyone?
After some thoughts and discussion with fellow game developers, the answer was in fact really simple: I had to change my GiT repository so we could pick what to import in the package manager without the hassle of writing command line. Easier for me to manage, easier for everyone to pick the unique asset they need or the whole package, without the need to split the repository. I faced some issues so I’m sharing here the results of what worked for me.
Some rules
I wrote some requirements I want to be satisfied:
- still, use my “Standard Assets” repository
- import easily one or multiple assets in any unity project
- no use of third party plugin for the import process
- limit to trusted or known servers (Unity, GitHub, etc.)
The starting point
The hierarchy I use in the repository replicates the one used in my previous projects: one root folder, and one folder for each asset.
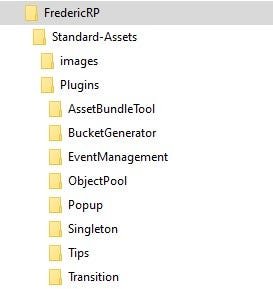
As shown above, I used the special subfolder “Plugins” from only one repository to include it in my unity projects. This special folder allows telling Unity to compile them in an assembly before the others. You’ll notice that will change. From that folder, I exported one package that contained everything. One README file for every asset, and another one in the subfolders that were essentially a copy/paste for their specific paragraph.
Now, I have to understand what changes need to be done in the folder hierarchy and how to import them in unity without error.
You have to know that importing subfolder in the package manager only works from Unity 2020.1.a21 BUT was also backported in Unity 2019.3.4f1. I tested it in Unity 2020.1.0b7 and 2019.3.5f1.
For most assets, that should not be an issue to import them in another version of Unity (at least a 2018 release), but if there’s an issue and you have to use a specific version, don’t hesitate to ask me for support.
Folder hierarchy changes
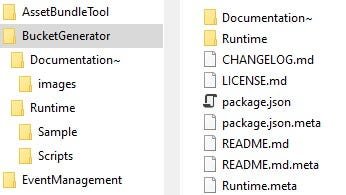
The subfolder Plugins could remain, that does not matter for now, but I move the images for each asset to their relative “Documentation~” subfolder, which allows me to still have a preview from the GitHub main page and have everything in each asset subfolder.
For each asset, I have to comply with the requested package layout: I have to move all scripts and other assets in the “Runtime” subfolder, exception made for the editor assets that need to move in the “Editor” subfolder.
I already had a README.MD file so I just need to update it to use images that are in each asset subfolder and not the root images folder. For now, I also copy/paste it in the subfolder “Documentation~” so the package manager finds it also.
GiT reads the README on the root folder, the package manager requires it in the Documentation subfolder.
Good news: I wanted to add a changelog but did not really take the time to do it. That is now the right time! And since even Unity suggests it, I will use the “Keep a changelog” advice also.
That’s it for the new hierarchy.
Import in Unity — now comes to the real work
I use both bitbucket and GitHub as main online repos, and since I started with bitbucket, I’m used to SourceTree and its GUI. I tried some other GUIs but never managed to have the same amount of satisfaction in both “working tool” and “nice to use”, so I still use it (the fact that I once developed using a mac can matter as it was more stable and errorless on a mac before it did on Windows).
With SourceTree, the git used is embedded by default, and you still can use it if you want. For authentication, I use SSH private/public keys and the pageant software that is included also with SourceTree, so it’s pretty straightforward if you stick with it.
Unity does not know you are using pageant and is not able by default to use your private key nor ask you to enter the passphrase.
So you have to tell it, and that means tell Windows where it is, using one environment variable.
GIT_SSH
Set this environment variable to your SourceTree “/tools/putty/plink” executable. Do not include quotes in the var, even if the path includes spaces: GiT handles it and it would add unnecessary quotes and break the command line. For instance, mine is set to:
C:\Users\FredericRP\AppData\Local\SourceTree\app-3.3.7\tools\putty\plink.exe
Beware that pageant must already be loaded with your key, because you won’t be able to set it nor enter the passphrase from the Unity Package Manager (UPM). That should not be a problem if you work on an everyday basis on your projects as you surely already have pageant launched with the key(s).
From now on, you can add an asset using its git repo like git@github.com:FredericRP/Standard-Assets.git, and even specify an asset from a subfolder like /BucketGenerator from the UPM!
Click add on the package manager and enter the URL below.
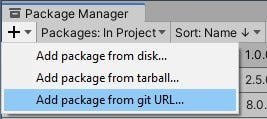
git@github.com:FredericRP/Standard-Assets.git?path=/BucketGenerator
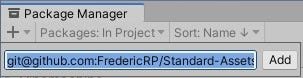
Actually, you can check the available assets from the FredericRP Standard Assets GitHub page.
If you have one asset without any dependency, that’s almost it, the last step is to create a proper package.
Assemblies and package
This was something I wanted to change since the beginning: each asset should not be compiled each time someone changes one script in its project. The Plugins special folder enables that, but if I want to update one asset, it compiles the whole set. So I decided to create an assembly definition for each asset also. In fact, that is also required when you create a package managed from unity.
I hope that it does not increase the memory footprint somehow but I had no time to check that for now: if you have intel, please share them on the comments!
Each assembly adds a tiny file in each Runtime and Editor subfolder, named after the asset name, be sure to follow those rules also. You only have to click on “Create / Assembly Definition” in the correct folder (Runtime and/or Editor subfolder of your package), name the file accordingly and that’s it!
The last step to have a compatible package is to create a file named package.json on the asset folder that suits the package.json template, and you’re done. Here’s a sample below.
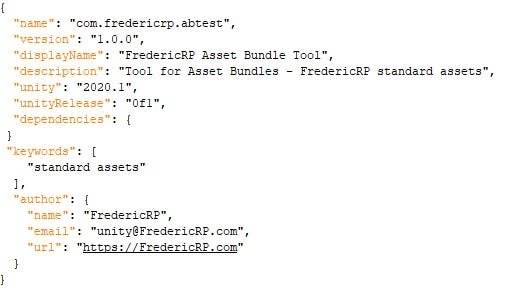
You should have now a folder like the following one:
Importing in UPM
Once everything was settled, I tried to import the simplest package: the Asset Bundle Tool one (you’ll notice the outstanding description).
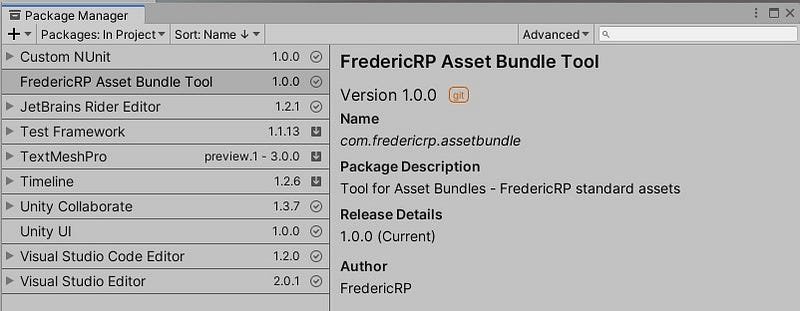
Success! Oh, that was almost too easy, right?
Right.
For packages without dependency, there is no issue at all after that. But most of my evolved packages have dependencies on the simpler ones, too bad.
Custom dependencies
So I tried to add dependencies, using the same SCP pattern (ie package source like git@github:FredericRP/etc), but unfortunately, this pattern is not recognized.
After some research, I found out that custom packages can not have dependency at all. They say it’s a security reason so a package can not add a hidden package that would contain malware in it as npm can do. I understand that, but I still want to share my packages.
One solution is to make your own hosted scripts visible from the UPM, and that requires a properly configured scope package registry. For instance, my packages name starts with “com.fredericrp”, it’s their scope, and I could use GitHub to publish packages as it can be used as a scope package registry.
The solution for your own studio
The UPM knows the Unity package registry, but no other registry. You can add one yourself by adding the following lines in the project manifest file:
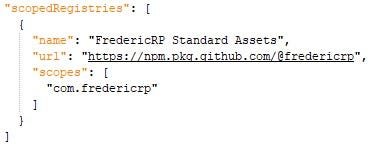
Here it is as text so you can copy/paste it:
“scopedRegistries”: [
{
“name”: “FredericRP Standard Assets”,
“url”: “https://npm.pkg.github.com/@fredericrp“,
“scopes”: [ “com.fredericrp” ]
}
]
Once this step is done for a project, you can add any package from that repository with only their name!
I didn’t choose this solution as it requires too many steps for standard users, but I did test it to understand all the steps.
If you want to create your own studio registry and have your colleagues access it, I think this is the best solution!
You’ll have to:
- create an access token (github/ developer settings, with the read:packages, repo, write:packages permissions)
- log in using npm (if you don’t have one, create an account in npmjs.org)
- create a “upmconfig.toml” file with valid credentials in it.
If you want specific control on your packages or don’t want to use GitHub, you also can create your own package registry using Verdaccio, hosted on your own server. A more complete and sophisticated approach is OpenUPM that does a great job!
You can also add the following line in your package.json file to publish to your GitHub account (change the account name of course):
“publishConfig”: { “registry”: “https://npm.pkg.github.com/@fredericrp” }
Once all that is done, use the standard npm publish command line to upload and publish your package so it’s available for other developers (that have permissions on the repository).
But… does it fit my needs?
Ok, so that’s fine for a private package registry. But I want to share packages so everyone can access them easily, and that’s not easy!
Some developer has published a core package that adds a new scoped registry when the “core” package is imported, hosted on his server so it’s easy to import the other packages. I won’t do that, that’s my rule n°4. He also used NewtonSoftJson to read and write to/from the project manifest file and it also breaks my rule n°3.
To this point, I told myself that there were two solutions:
a. use Unity Asset Store API to publish the packages on it directly.
b. find a way to add dependencies from the repository somehow.
Unfortunately, there are no asset store API to publish packages, or I haven’t found them. I only know APIs to get sales. So I went for (b) instead!
If you just want the answer and not the thinking process, skip next part :)
The Return of custom dependencies
Instead of using the “dependencies” key on the package.json file, I added a “custom-dependencies” key in it:
Each dependency contains the full GiT URL with a version, for instance:
git@github.com:FredericRP/Standard-Assets.git?path=/Singleton#1.0.0
Once it’s done, I add a script called “DependencyUpdater” with the attribute [InitializeOnLoad] so I can execute a method right when the package is imported by Unity.
This script does the following:
- ask the UPM the current list of packages (no need to check the online status, it just did as we imported a package)
- read the package.json file to check if there’s any custom dependency
- add them in the project packages list
I filter the package list to only check mine, so the package name starts with “com.fredericrp”.
The package.json file can be located under packageInfo.resolvedPath from that list (in fact, the AssetDatabase can also give you access to the package files, you have to use the package name with “/Packages/” prefix, without the version).
With a custom internal class, I can use JsonUtility to read this package file (that’s rule n°3). One issue though I encounter here is that a dictionary like the one used to list dependencies in a standard package file can not be read by Unity JsonUtility: it uses serialization and Dictionary are not part of the process (I could have used the System serialization instead but the next step will show that it did not matter). That’s why I made the “dependencies” value a list of strings containing both name and version.
Remember that we use the full GiT URL with the subfolder path, not the real asset name. After reading this, the script adds packages as the user did for the first one, using the UnityEditor.PackageManager.Client.AddRequest method. As simple as that.
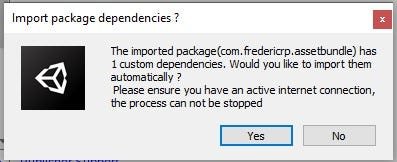
Using this “custom dependency updater” means that every single package (that has dependencies) has to contain this script, and it should destroy itself after usage so it does not conflict with the other packages when imported (or exist in the package namespace only, what a waste of space). Another way would be to publish this as an asset store free package and let it handle all packages import, but I’m not sure Unity would allow an asset that is a workaround for a security limit they created.
That was fun to create and taught me a little more about how packages are handled, so you can find it in its own repository! But it’s still not the solution.
Another dev coded a tool pretty close to this script (but fancier) as a GitHub package. The concept is similar, requires you to add this package so it can resolve other package dependencies and uses GitHub tags. You can find it on his GitHub page if you want to try it.
Semi-automatic publishing
That leaves me with the publishing API!
Wait, I said there was no API, did I?
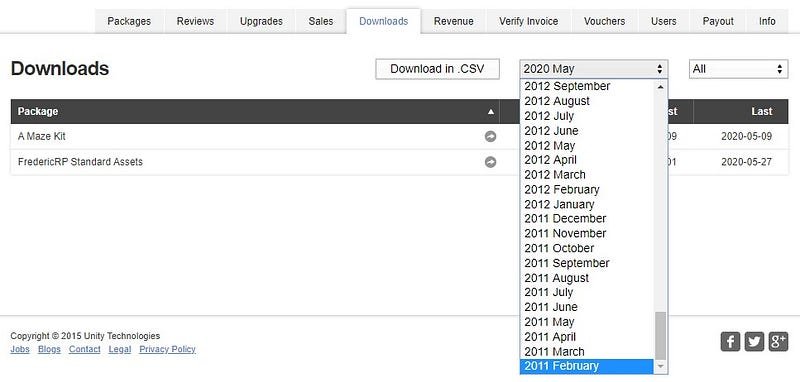
When you are a publisher on Unity Asset Store, you have access to a portal that allows you to create packages, set their description, title, screenshots, see the download and sales data. They even added an API for this part (wow, first packages I shared were in February 2011, how old am I already ?)
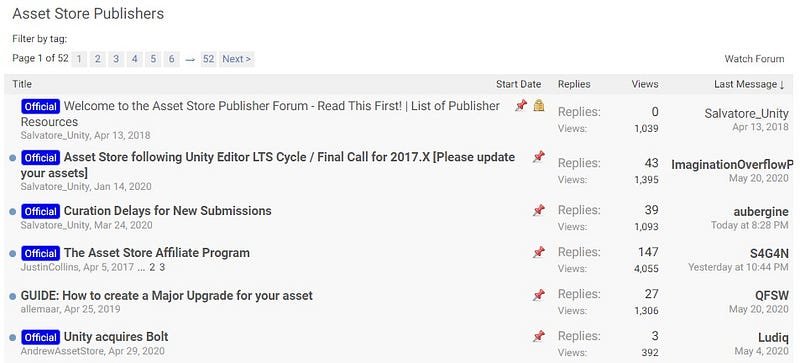
You have obviously a dedicated forum as a publisher for specific questions.
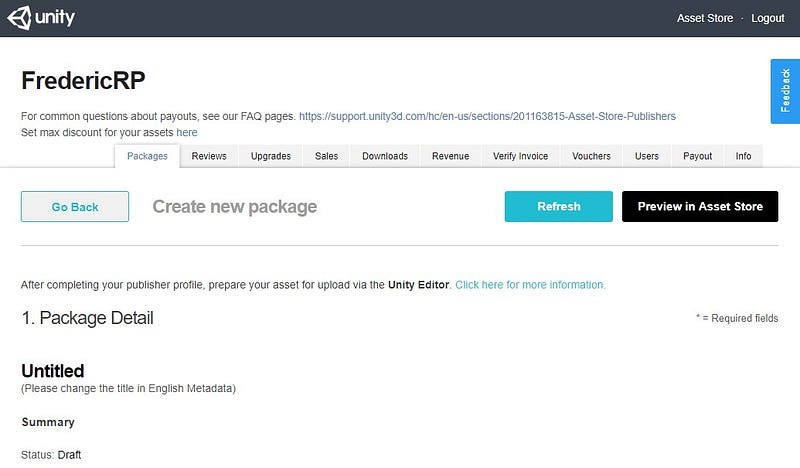
The creation process and the upgrade process require that you log in to the publisher portal.
From the portal, you have to create a new package or a draft for a new release of your package before anything else.
After those steps, use the Asset Store Tools, available from the asset store, to validate your package and submit it.
Everything has to be made manually, using the website and editor windows. But if you look into the publisher website, you’ll notice JSON calls to the kharma.unity3d.com site, it looks like an API, right?
Other devs already looked into it, in fact, one of them shared a piece of code in the forum. And another one included this with a little evolution in its RockTomato asset, as an AssetStorePublish step (well, it seems they both looked into the same stuff in January).
Final solution
Before submitting the Standard Assets package to the unity asset store, I already had a test project used to check everything is ok and submitting the asset. But there’s no version control on this one as it’s essentially a project with a git submodules and the asset store tools imported and almost nothing more.
This is the main change: instead of only using this project to manually submit the project, I will use it to submit each one asset, using one script only, used when I tag a version on it.
Because I have no timeline telling there’s a big change in one asset, I still use one repository, but that will change too: one repository for one asset is the simplest use case, final point.
So let’s dig a little deeper into that process. Once again, if you just want the solution, skip this part.
Login and fetch packages
The API class created by the above-mentioned coders will change a little but the core is already here to be able to log in and fetch your packages as a publisher.
My goal is to:
- be able to select all the assets I want to update
- save the configuration (aka: asset folder in the project, etc)
- upload when I want it from an external script (ie: not launching unity each time I want to do it)
Let’s start by creating an editor window that allows to log in and display the fetched packages.
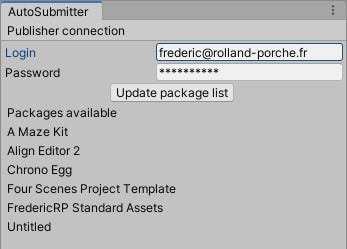
Once you’ve logged in, Unity stores a session in its prefs, so you can use it without login twice for next API calls, so you can “auto-login”.
And I don’t want to have to log in, or auto-login, each time I want to change the configuration of one package, there should be a local cache or something, let’s do that! But of course, the update or upload can not be done if you’re not logged in.
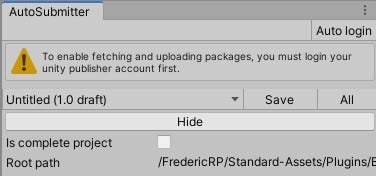
Ok, once this is done, let’s test the upload!
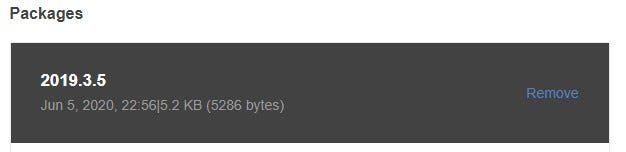
THAT IS WORKING!
From this same publisher portal, you can specify dependencies in the packages section.

As of today, it seems that dependencies are not available through the APIs, but it could change in the future.
The publisher portal seems to link directly to old formatted asset store for now, and not V2 URL as required for dependencies in the same page, so be sure to browse your asset from the public asset store itself.
Let’s continue the work. As I said, I want to be able to select the packages that will be uploaded from that project, and as a matter of fact, I’ve got a lot of deprecated packages and I don’t want to be distracted by them in the list, so I add a “visible” property to them. I also add a “status” indicator telling me if a package can be uploaded (for now, it’s green when the status is “draft” on the publisher portal, and black otherwise).
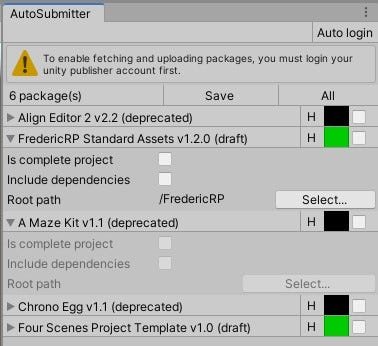
Good, but not great. Let’s improve that window right away, using the internal icons! To use them, you just have to use the following code line, and the names can be retrieved using a little tool that I found here. It’s a great way to improve your editor window look and feel (if you don’t use Odin for instance). The second parameter starts with a pipe “|” so you only specify the tooltip for the icon.
EditorGUIUtility.IconContent(“console.warnicon”, “|Status: “);
In the process, I changed the window so you can select an asset to be uploaded only if the status is ok.
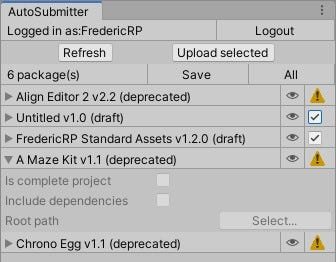
When an API is called, it’s a web request so it’s not synchronous: you can change configuration and save it but other calls should not be made if you don’t want any trouble. To prevent that and so the user knows what’s going on, I added a help box to indicate when a request is in progress.
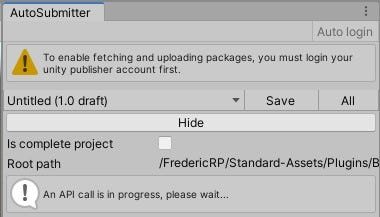
Final step: be able to use it without even launch Unity. Thankfully, with more arguments than before, you can launch it without GUI and call a method right from command line arguments.
For this step, I refactored a little my code so everything related to packages is located under the AssetStoreAPI class. The Editor Window uses the API and contains only the visuals and I create a new class, BatchSubmitterClient, that will be the class used with the command line.
For this to work, it has to be in an Editor folder, and the method has to be static. As we call APIs and the response is asynchronous, we can not use the “-quit” argument when we start Unity in batch mode otherwise it ends the process before the first call gets its response. But do not forget to end the process with Application.Quit() if you don’t want to lock your project and Unity to stay in memory. The command line is something like below, depending on your project path:
Unity.exe -batchmode -projectPath “Drive:\Path\To\Project\Root” -executeMethod FredericRP.AssetStoreTools.BatchSubmitterClient.UploadPackages
All cached data are stored in editor preferences, so it’s shared between all projects. That’s useful when uploading the same package with multiple unity releases to enhance compatibility checking and don’t see any trouble that could cause for now, but that may change.
That’s it for now!
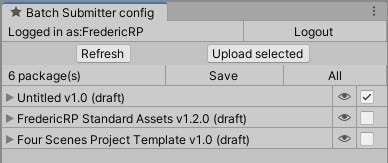
Of course, the tool is available freely in its own BatchSubmitter repository, use the following URL to import it in the UPM!
git@github.com:FredericRP/BatchSubmitter.git
The next steps involve being able to change the configuration using command-line arguments, my time is split between day-job, kids and this side project, so I’ll update the tool asap but don’t have an ETA yet.
Other issues
During the upgrade of my GiT repo, I stumble into some issues that prevented me to be able to import the packages, but without any information on what the problem was.
package no found
Even if there’s a package.json file in the asset subfolder, having an invalid JSON file prevents unity to print the correct log in the console. That works when you import a package from a root folder in a GiT repo, but not from a subfolder. So if you have a package not found error printed in the console, check that your package JSON file is valid (I used a test repository with the asset put in the root folder to do so).
unity hub still in memory
When changing environment variables, you can close unity, reload it, and think that it takes into account the updated variable. You’re wrong: since it’s loaded from the unity hub and stays in memory by default, you also have to close it from its tray icon.
8 new packages
Those eight new packages are available from my GitHub page as before and will be soon published on the asset store as independent packages so you can now choose what you want to include in your project. I don’t have a roadmap yet for the other packages I want to include here, so be sure to watch the repo of my publisher page for any update.
Thanks for reading!